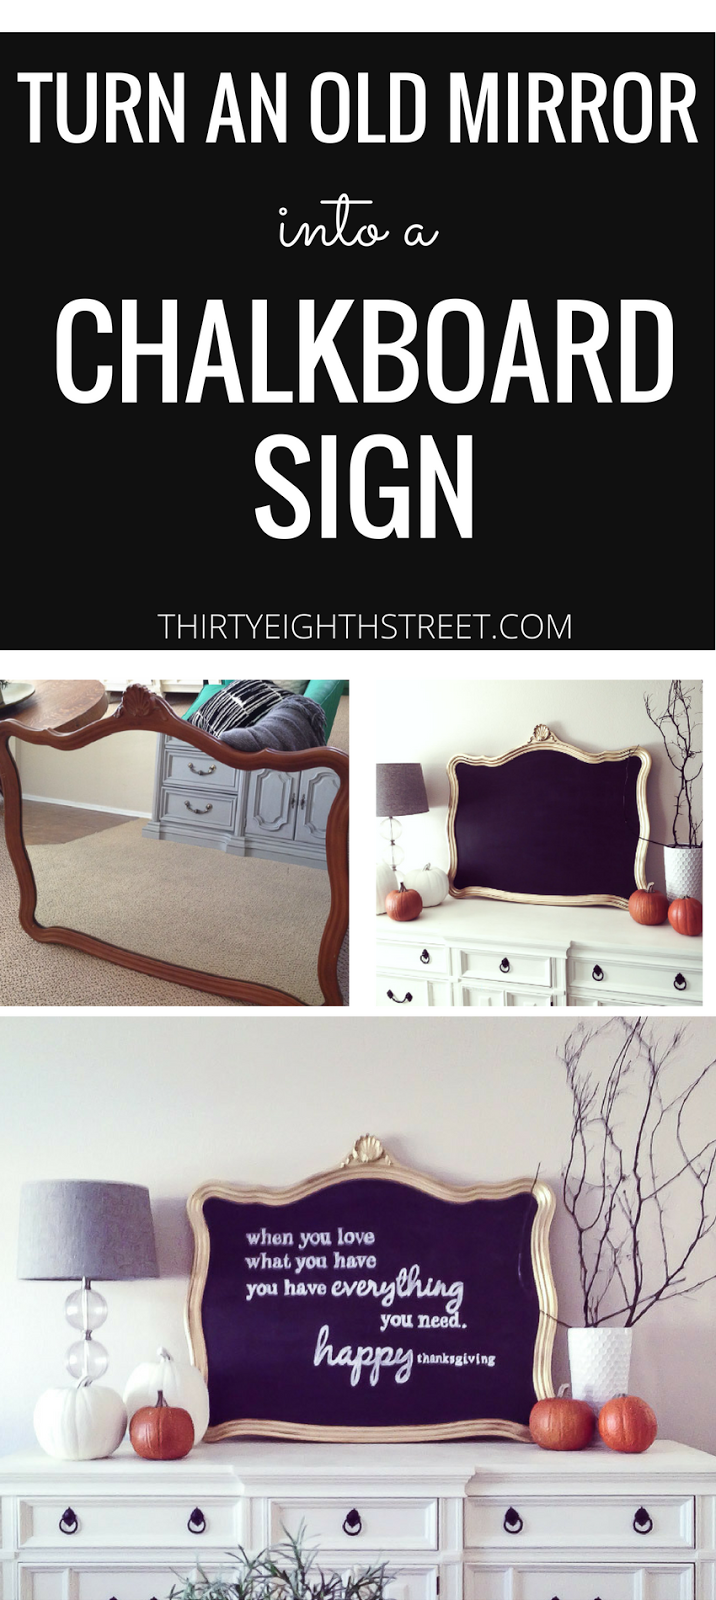
DIY signs are easy to make! In this DIY sign tutorial, you'll learn how to enlarge an image for FREE and repurpose a mirror into a chalk board to create an easy DIY Fall Chalkboard Sign. DIY signs are a budget friendly option when you're looking for inexpensive home decor, even a beginner can do it!
It's not very often that I show you the "after" of a finished project at the beginning of my posts. However, I wanted to show YOU that YOU CAN create beautiful DIY signs and they:
- don't have to be expensive!
- you don't have to have nice handwriting to artistic abilities to make them look beautiful!
- you don't even have to have wood OR TOOLS to create them!
In the time that it took me to watch a movie, I was done with this homemade chalkboard sign. Are you intrigued?! Excited to learn how? I hope so! Because THIS DIY sign was so easy to put together!
AND this particular style of homemade sign is so versatile! You change them and use them for just about any time of the year!
Disclaimer: This post contains affiliate links to products I love and use everyday. You can view our full disclosure here.
Have you ever purchased something that you didn't really need simply because it was on sale or better yet... because it was FREE?! Raise those hands! :) You know what I'm talking about!
As soon as you see the words FREE or a SuPeR sale our wheels start to spin and pretty soon we have talked ourselves into getting something not because we really need it, but because it's the deal of the century!
This mirror came with a thrift dresser as a packaged deal and while I loved the size of it, the mirror had a lot of scratches on it. Rather then throw it away or spend more money to have another mirror cut, I decided to transform this old mirror into an easy DIY chalkboard sign!
DIY Chalkboard Sign Tutorial
Chalkboard Sign Supply List:
(Some of the links below are affiliate links for your shopping convenience.
Click here for full disclosure.)
Click here for full disclosure.)
- Typography Image or Phrase- We offer a FREE Fall printable here.
- Chalk or Chalk Pens
How To Make An Easy DIY Chalkboard Sign From A Mirror
1. Remove the frame from the mirror.
2. Spray the frame with Rust-Oleum Metallic Gold Spray Paint or paint your frame in your favorite spray paint colors or DIY paint.
3. While the frame is drying, place your mirror on an old towel or tarp. Spray with Rust-Oleum Chalkboard Spray Paint per the directions on the can.
Tip! This project took three coats letting each coat dry completely before applying the next.
Spray your first coat vertically. Second coat, horizontally and your third coat vertically again.
Tip! This project took three coats letting each coat dry completely before applying the next.
Spray your first coat vertically. Second coat, horizontally and your third coat vertically again.
4. After the chalkboard is completely dry, (follow the drying times on the can) prep the chalkboard by rubbing the side of a piece of chalk all over the chalkboard.
5. Attach the mirror back to the frame.
That's it! You've created your very own DIY chalkboard sign! Now... comes the creative part!
Sign Up HERE for our weekly newsletter so you get FREE ACCESS to our library of furniture tutorials, additional tips & tricks and notice of the best DEALS on home decor items!
How To Enlarge An Image & Create Hand Lettering
#1 Select a quote or image or create your own.
If you're utilizing an existing image, make sure you've paid for the rights to use it or ensure that it's free for personal/commercial use.
If you'd like to create your own, you can utilize free photo editing sites like Fotor, PicMonkey or Canva to help you create your design. If you need a white background to start you can easily upload a white blank .jpg from COLOURlovers.
#2 Enlarge it.
You'll want to decide how big you want your poster to be in order so that it fits your chalkboard surface. Gathering a few blank 8 1/2 x 11 size papers can help you visualize and measure how large your sign should be.
_________________________________________________________________________________
RELATED POSTS:
- 22 Black and White Home Decor Pieces You'll Love!
- Simple Chalkboard Lettering Made Easy!
- 14 Jaw-Dropping Fall Inspired Furniture Makeovers
- How We Created Sentimental Watercolor Artwork From Our Family Photos.
- Matching Christmas Pajamas For The Entire Family
- DIY Modern Christmas Tree Advent Calendar That's Easy To Put Together!
_________________________________________________________________________________
#3 Assemble Your Papers.
Print and tape the papers together to form
your enlarged image. Flip your enlarged image over so the back side is facing up (see example picture above).
Use the sides of your chalk and rub the back of your image back and forth making sure to get complete chalk dust coverage over all your letters or image.
Use the sides of your chalk and rub the back of your image back and forth making sure to get complete chalk dust coverage over all your letters or image.
#4 Trace.
Place the sign on top of the chalkboard so that the newly dusted side is touching the chalkboard and adhere it with a few pieces of tape.
Take a pencil and trace around all the letters making sure you press hard enough for the chalk to transfer onto the board but not too hard that the paper rips. Pull the paper away from the chalkboard and to reveal a light version of your image.
#5 Fill In the Letters.
Last step! Fill in the letters or image with chalk or chalk pens
If you happen to see smudge marks or if you make a mistake, it's ok! Chalk is forgiving and erases easily! Grab some q-tips and a little bit of water and erase away any mistakes…
Do you have an old mirror lying around that could use a makeover? Consider repurposing it into an Easy DIY Chalkboard Sign or update it and give it a new look!
If you're looking for a cute Fall printable you're going to get giddy over this Free Fall Printable (for personal use only) or click here to get some more ideas from these mirror makeovers!
Check out our Magic Shoppe Vintage Sign we created out of an up-cycled hutch door for more Fall/Halloween DIY Decor Ideas!
If you liked this article, we would love it if you'd share it on Pinterest or Facebook. (This lets us know what kind of helpful resources and DIY furniture makeovers you'd like us to write about in the future!)
Happy up-cycling!
Carrie || Thirty Eighth Street


Those old brass mirrors are so outdated, but look amazing as a chalkboard. I love the saying you chose as well. I know some people print the chalkboard with paint I agree doing it with chalk is a much better idea.
ReplyDeleteI agree! I love the contrast between the black chalkboard and the gold frames. :)
DeleteVery cool! Thanks for linking up at Welcome Wednesdays!
ReplyDeleteThank you, Rebecca!
DeleteGreat job! Love the shape of the frame and a chalkboard is always a great idea.
ReplyDeleteHappy Thoughts of Home. :)
It was really easy to do! Thanks, Stacey!
DeleteBeautiful transformation of your old mirror. Thanks for sharing at Talk of the Town.
ReplyDeletegail
This is lovely! I have a great frame off of an old mirror, I think I may have to try this! We would love to have you join us at the to Grandma's house we go link party!
ReplyDeleteI hope you do! It's such an easy project! Thank you for the invite!
DeleteOh I love this, I found out about chalkboard paint the other day and think it is a great idea. I was going to paint the boys wardrobe doors with it but this is a much better and more arty idea! love it # WAYWOW
ReplyDeleteChalkboard closet doors sounds amazing! If you do it, I'd love to see it when you're finished!
DeleteI love this. The frame is the most expensive part, if you can find a cool one, snatch it up! I love this idea, and you've made it so simple to accomplish with this great tutorial. I will have my eye pealed at garage sales and thrift stores. A great frame is priceless! And I am really into chalkboard style!
ReplyDeleteI have a frame hoarding problem, Nikki. ;) I wish there was an organized way to store them until I put them to good use!
DeleteI love how your chalkboard turned out! That frame is fantastic! Thanks for linking up with Creative Spark last week. I chose your project as one of my features for this week's party, which starts at 6am EST tomorrow. Hope you'll join us again :)
ReplyDeleteThank you, Emily! I'm glad you like it!
DeleteCarrie, this is such a great tutorial! It turned out great! Thank you for sharing. You will be the Star Feature tonight at the Before & After Wednesday party at The Dedicated House. The party starts at 8:00pm Central time. Hope to see you again! Happy day to you! Toodles, Kathryn @TheDedicatedHouse
ReplyDeleteWow... You made my day! Thanks so much, Kathryn!
DeleteOh my goodness I love this chalkboard!! Thanks for sharing the different types sites that you used to make this, awesome resources for future projects!
ReplyDeleteYou're welcome! Those sites are so handy!
DeleteYour fall chalkboard looks wonderful. I love the curves of the frame. Thanks for showing us how you made this at Snickerdoodle. Pinning.
ReplyDeleteI'm glad you enjoyed it! Thank you for sharing it on Pinterest, Beverly!
Delete